
Friday, February 26, 2016
Fluffing up the Groundhogs
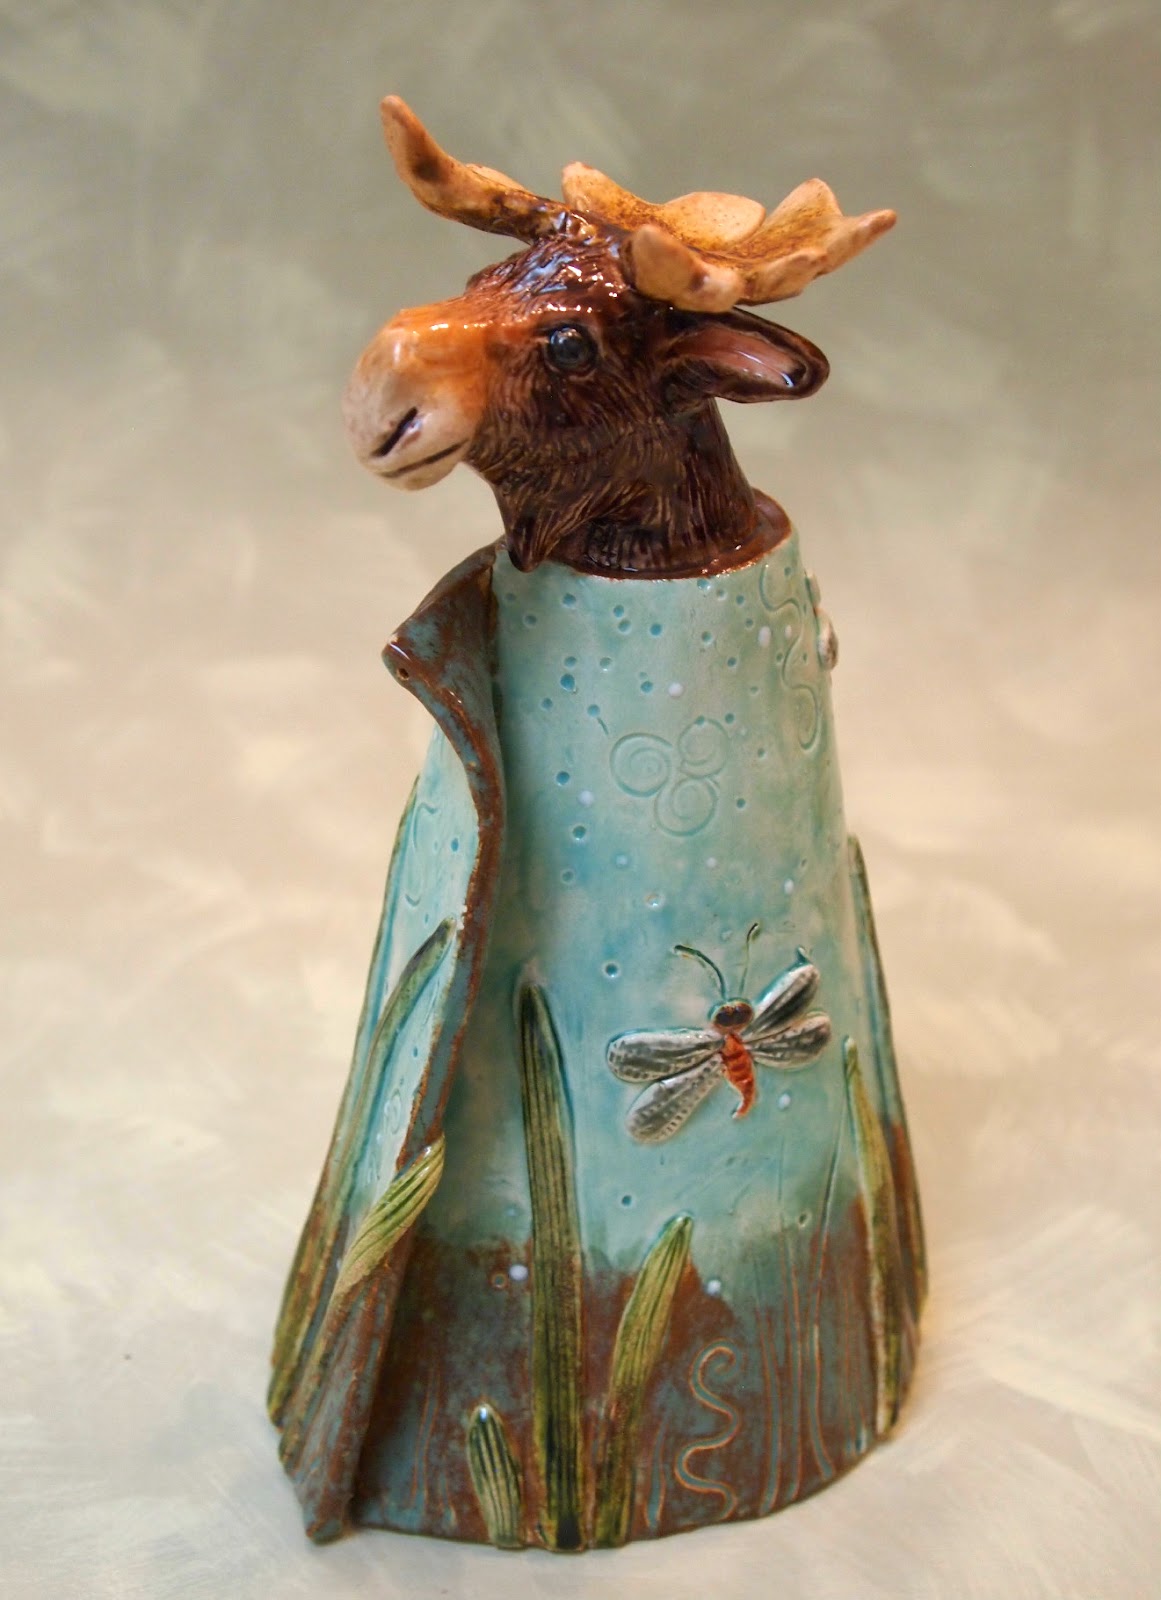
Sunday, February 21, 2016
On to the Next Painting - Groundhogs

I've been very happy with my method of doing the drawing on Strathmore 400 drawing paper then gluing the drawing to a piece of hardboard. Covering the drawing with 2 or 3 coats of Liquitex clear gesso makes a great painting surface for the oils I'm now using, and the method has the advantage that I don't have to transfer my drawing. And...,while I'm drawing I can do as much erasing and re-drawing as I need to - just no cutting and pasting because, as I found out in my "Tea in the Hedge" painting, the edges will show.
For this painting, I was able to cut a piece of hardboard to exactly fit a vintage oval frame that I had purchased - another advantage of hardboard as a base.
Anyway, here the groundhog family is after the first painting session. My goal was to simply block in the colors and, in doing so, begin the modeling on Duchess and her cubs. The family is in front of the opening to their den and, as it turned out, this is about all the painting I did to the den interior except for a bit of detailing and modeling later on. I'll leave the foreground plants until I'm completely finished with the animals.
I'm inspired by these lovable rodents, also known as marmots or woodchucks.
Saturday, February 20, 2016
The Fox Painting is Finished

I sat it in this nice old Adirondack frame for the photo, but it will have to dry for a few months before I can varnish it.
I have not lived around snow (except for the once we get some every two or three years) for nearly 40 years now, but I still remember it vividly, especially the quite soft rustle of it falling. I hope to live around snow again one day. In the meantime, I'll have to settle with painting it!
Friday, February 19, 2016
Continuing the Fox Painting

Sorry that the lighting is so bad on this photo. Also, I think I may have skipped a session. So, all in all, my documentation of this process hasn't been all that good.
Anyway, I did a lot more work on the snow. I also added the wire on the fence and some snow on the wire here and there. As for the fox, I used washes to cover the white texture lines I added before. I also strengthened the shadow beneath him.
When I painted the snow, I used bluer and slightly grayer colors for the mid-ground field than I did in the foreground where the fox is standing. As I painted the mid-ground show, I just slapped the colors on in generally horizontal strokes. Then I stood back to see what little bumps and indentations were suggested and strengthened those. I particularly like the ones in the upper left. I also added a shadow on the snow in that area where the tree with all the snow on its branches would cast it.
I've enjoyed painting the snow!
Sunday, February 14, 2016
Beginning the Fox Painting

For this painting I'm returning to one of my favorite subjects - foxes. I've also enjoyed doing foxes in ceramics and needle felting, but I haven't found, in either of those media, quite the "just right" color for fox fur, so it's nice to be working in a medium where I have - for better or worse - complete "color control."
I forgot to take a photo after the first painting session. At that point I had blocked in basic colors, but that was all. I think this photo is after the second painting session. I did a lot more work on the distant trees and also on the foxes fur. Come to think of it, this photo may be after three painting sessions because in the second session I would have put more local color for the highlights and shadows in the fox. Then in the third session I would have added all the white fur texture that you see here.
My method on the fox fur is to block in color, paint texture with white, then I'll wash over it again and continue building texture in that fashion. The fox colors are transparents - Burnt Sienna, Raw Sienna, and Burnt Umber (although the legs are Van Dyck Brown and Black - and mixing them with white for the texture just gives you chalky looking color - yuck!
I really liked the colors in the distant trees. I used various mixtures of Dioxazine Purple and Golden Ochre, along with Van Dyck Brown, Burnt Umber, and a little Burnt Sienna. It seems to work well to mix the colors for the distance from near opposites on the color wheel. I really like painting snowy woods and snow scenes although I haven't really done very many of them.
Friday, February 12, 2016
All Glazed and Ready to Go

A while ago I posted a photo of these pieces in the kiln ready to be glaze fired and said I'd post photos of the finished pieces, so here they are.
As far as the fox goes, I have mixed feelings about leaving the large flower shapes on his robe white. Perhaps peach or lavender would have been better, but not so much better that it seems worth re-firing him. I'm pretty pleased with him as he is.


Sunday, February 7, 2016
"Tea in the Hedge" Session 5, then Finished!

Now it was time to turn my attention back to the hedgehogs. I gave them more detail both in the faces and in the "fur." The mouse received more attention as well. This was the most fun part of the painting so far. I also added highlights here and there in the foliage, especially the ferns, and darkened some of the spaces around them. I added a violet behind one of the hedgehog's ears, added a few violets in the foreground, and washed a bit of purple in parts of the background.
Now it was time for the finishing touches. I added shadows on the top of the stump (very scary) and more foliage in the nearest foreground, setting the tea scene "back into the hedge." Finally, I deepened the lower part of the space between the hedgehogs.

Here's the "story" that goes with this painting:
Hedgehogs are not so unlike the others of God’s creatures in
that as they’re enjoying one meal they’re anticipating the next! So it was that, over a cozy breakfast, Maeve remarked to Sidney how
delightful it would be to invite young Harry to afternoon tea. Sidney thought it would be capital indeed and
thus the invitation was extended.
Harry was not so keen on tea, but he had heard rumors of the
sheer excellence of Maeve’s ginger drops and so accepted the invitation
eagerly.
Now little Harry was from a large family, and there was
barely time nor energy to spare beyond keeping body and soul together. Many were the hours that Harry and his dear
brother and sisters gleaned the hedge for morsels for their humble table. But meager though Mama’s means might be, her
spirit was refined. She well knew the
importance of Manners and every evening over supper ensured that all her young
were well schooled in the social Arts.
And so it was that Harry arrived at the appointed time and place with a
hostess gift, the most perfect wood violet in the hedge. Sidney immediately exclaimed how delightful
the bloom would be in Maeve’s lovely tresses but, alas, neither he nor Maeve
could reach. Harry gallantly took up the
task. As he scrambled through Maeve’s
quills he became somewhat disoriented and installed the blossom backwards!
Nobody seemed to mind.
Wednesday, February 3, 2016
"Tea in the Hedge" Session 4

At this point I can paint the foliage in front of the stump. I like that the background on the right is darker than on the left, and I enhanced that. It always helps me to set up my painting next to the TV in the evening so that I can have some time to evaluate it quietly and from a distance. It's at these times that the subtler things like overall color or value patterns make themselves apparent. When I'm actually painting I just pretty much see the detail.
Tuesday, February 2, 2016
"Tea in the Hedge" Session 3

Subscribe to:
Posts (Atom)