Overall it's been a good art year for me. (But then, any year that's filled with art would be!) There have been successes and disappointments, enjoying new techniques, and returning to old ones. And through it all, there have been those happy get-togethers with my art friends.
I was thrilled to have a piece accepted into the prestigious Bead and Button Show - my third piece to have been accepted in four tries! I was planning to travel to Milwaukee to see the show but last-minute problems with my house stopped those plans dead in their track! One of my gourds go an Award of Excellend in Placerville Arts Association's Mother Lode Show and I also won several awards in the member shows. And most exciting of all, I completed four murals for the county fair Agriculture building in Bloosburg PA and took a trip there to see them installed. The highlights were meeting new friends Dave and Sharon and seeing Alan Jackson's concert at the fair. I even got to go backstage for "Meet and Greet" with the country music super-star. I didn't know I was capable of such excitement!
On the disappointment side, my book proposal "You Can! Sculpt Animals in Polymer Clay" was rejected by Kalmbach Publishers. They were quite complimentary about the work but didn't think there was a market. I wonder if that will end my wishful thinking about publishing another book, or if I'll follow a different publishing path?
Of course, making Art Dolls has been a great new adventure for me. And I would say I'm firmly sucked in! Strangely (or maybe not) I find myself returning to some old techniques for me, such as sewing, knitting, and crocheting, in completing these pieces. I really like hand sewing. It's so relaxing. Though I know that though may not be "normal!"
And I always find myself returning to drawing which, I suspect, may be my favorite medium of all.
Thanks to my sister, daughter, and son-in-law who have encouraged and supported me so much, and to all my art friends whose comradery means the world!
So 2012 comes to a happy close and I look forward to a new art year...
Monday, December 31, 2012
A Golden Beginning
 The NIADA convention that I mentioned a few posts ago is also having a challenge and the theme is "the golden one." My concept is a little tricky to explain, but it's a combination of a fairy and a bear. The bear will have baskets on her back that are filling with the flowers the fairy is collecting. She will be holding a very special one she has just found - the golden one.
This is the beginning of the bear. As usual, I sculpted the head and paws from polymer clay and am now neeld-felting the bear over the felt-covered wire armature. I'm using white "core wool" to begin with, saving the brown more expensive wool for the outer layers.
The needle felting is tedious but also satistying work as you see the creature slowly take shape. But I think I need to fashion some sort of thicker handle for my felting needle as my hands cramp after a time of holding onto such a narrow needle.
Lady Elaine

As with the Kindly Shepherdess, I sculpted her head and paws from polymer clay and then painted them. From there, I made her like any other doll with a felt-covered wire armature and cloth body.
Lady Elaine would have lived much earlier than this costume indicated. This costume is more of a twelfth century English style. But, to tell the truth, I originally set out to make Maid Marian from the Robin Hood legend. But part way through I realized that silk would have been the wrong fabric so I switch to Lady Elaine.
The only touch that really identifies her is the lily she's holding.
I most enjoy making the animal dolls. I'm contemplating a Robin Hood group for a project in the not too distant future.
Ursula as Titania

Ursula, my little Black Forest bear, finally emerged as Titania, Queen of the Fairies.
She was actually one of the very first dolls I made, but for a long time I couldn't decide on her costuming. Finally it just came to me. Ursula would dress up as Titania.
I made her fairy dress from silk chiffon and edged the hem with beads and hanging crystals. Making the ribboh flowers was a new and fun venture. I made her wings from glittery fabric stretched and glued over a wire frame. To hide the wire, I stitched a border of sparkly hex-cut seed beads, and added a few flat-back Swarovski crystals for more "fairiness." Her wand is a toothpick coated with glitter and tipped with a glitter-covered polymer clay star. Tiny star-shaped flat-back crystals brighten the center of the star. The ribbon is very fine metal mesh.
I think she is very fun.
The Prize Piggy

The problem was that once I had spent all the time on her clothes - hand-crocheting the trim on the slip and knitting the little sweater - I couldn't bear to smear mud (brown paint, actually) on it!
I really like, and enjoyed making, the clothes. The dress has a Peter Pan collar and it, as well as the waistline, are embellished with tiny ricrac. After knitting a gauge swatch I was able to design and knit the sweater which came out amazingly good! The only problem with the sweater is that is was difficult to find tiny enough yarn. You'd think there would be plenty of fingering weight baby yarn, but not so!
The shoes were really difficult. And, in the end, not successful. Her legs are, obviously, polymer clay. I made the socks from some old thin socks that I had. But then how to make the shoes? Polymer clay would work except that I couldn't have cured it (although I see now that if I had done the socks as I did and then shoes in polymer clay I could probably have cured the legs complete with shoes and socks before I put the legs on the doll - I'll have to remember that for next time). In the end, I made the shoes in place with air-dry clay. It's the first time I've worked with it and had a terrible time. The fact that they clay was probably about five years old and dried out (I added water and let it sit for several days) may very well have made the task harder than it needed to be. Then I had to paint the shoes because the clay was white. They look OK from a distance, but they just aren't quality work.
But I like the pig!
I think I need to muster up whatever it takes to put the "mud" on her. That way, the whole thing will make more sense.
The Kindly Shepherdess with her Flock

By the way, when I described this and the polar bear piece to my friend Patty she suggested that I call them the "world peace" line since I have animals that are natural enemies in friendly juxtaposition. I think instead that what I am depicting is the true spirits of the animals, "Spirits" in the sense of what they truly are without the burden of survival in this world.
A Polar Outing

I've written about this polar bear before, but here she is all finished. She and her two seal companions are headed out across the ice for some winter fun.
The costumes in this piece are quite understated. The bear's hoodie is made from a fuzzy sock and I crocheted her scarf from some recycled cotton yarn. The seals are only wearing scarves - knit from cotton yarn and secured with pretty vintage buttons. I just fell in love with the orange and pink combination on this sock. I carried that color scheme through to the seals by using a variegated pink/white yarn for their scarves and then using an orange button to secure one and a pink button to secure the other. Those colors add a nice bright tropical touch to the otherwise wintry scene.
I made the snowball that the one seal is balancing from polymer clay that I coated - after curing - with Art Glitter's Faux Snow glitter. If you've never seen their glitter, you should really check it out - the gorgeous colors and choice of finishes will take your breath away. Here's the link: http://www.artglitter.com.
Making the sled was the biggest challenge in this piece. I made it from think strips of oak, and brass strips and tubing available from hobby stores. I bent and cut the metal strips into the runners and cut small lengths of tubing for the struts to attach the runners to the wood sled. For that task I used E6000 glue, which is one of my favorite products. The rope is a twisted cord I made from thin satin cord. Tiny dots of velcro on the cord and the bear's paw allow the bear to "pull" the sled.
Numbers 1, 2, 3, 4, and 5
 I've already written about the first four - the little elf with her Corgi, the stable elf, the pastry chef elf, and Eveline. Here's the fifth one, "Bee Girl."
My favorite part of Bee Girl is her clothing. It's all silk, with the exception of the under-skirt which is a beautiful soft cotton brocade, a luxurious quilt backing fabric, actually.
Her skirt is supposed to resemble a flower. It's made of six separate pieces, three pink petals and three green/gold sepals. Each of those pieces is, in turn, made of four pieces, two for the right side and two for the lining. They're cut so that when a pair is sewn together it's shaped like a petal. As on all the dolls, it's all hand-sewing.
Her sleeves are a delicate light pink and her bodice is a sage green with a bee design woven in. The ruff is ribbon that's sheer with ruffled satin-y edges.
She's holding a bee I made from polymer clay wrapped with fuzzy shiny embroidery thread for the black and gold stripes. In her other hand, she's holding a flower stem for the bee.
Her hair is curly wool and the ornament is a vintage enameled and jewelled bee pin. I formed her legs from green polymer clay and painted them with gold designs.
Not a Vacation!
It's been a while now that I've been silent on this blog. But I haven't been on vacation! I've been working hard to complete ten art dolls to submit for an event at next June's NIADA (National Institue of American Doll Artsts) 50th annual convention in San Francisco. Since the convention is relatively close to where I live it seems like a great opportunity to educate myself on the current status of an art form that I have newly discovered and so much enjoy.
The event is called "Ten by Twelve." It's an opportunity for twelve "visiting artists" (i.e., not NIADA members) to show ten of their pieces, talk about them briefly, and hopefully receive feedback. The twelve visiting artists are simply the first twelve to sign up, so it was important for me to get my nose to the grindstone and get into that group. I inquired in mid-December how many they already had and mine was the second inquiry. I finished all the dolls and submitted the photos last Friday, so I assume I'm in! I sure hope it won't turn out to be an embarrassment for me! Some of us are too cricital of our work, but I sometimes err in the other direction.
NIADA appears to be a pretty exclusive group, at least judging from their process for accepting new members. It's a three-step process that takes two to three years to complete. At the moment, I'm thinking of beginning it (deadline for phase 1 is the end of May) but I'm leery of entering into another deep disappointment like my attempts at getting into the Society of Animal Artists. But, as the old adage says, "nothing ventured, nothing gained."
Monday, December 3, 2012
Assembling the Flock

Saturday, December 1, 2012
Shepherdess Clothing

The hardest part of her clothing was the shawl. It took a bit of trial and error to find a size of crochet thread that would give a reasonably correct scale. This is size 20 and I used a #8 steel hook. After struggling to hold onto the thread, I can better appreciate those who have successfully worked with the tiny thread - size 80, 100, or even thinner!
I constructed the bodice differently this time. I finished all edges of both the sleeves and the bodice and whip-stitched them together in place. It seemed to work better. Also, for creating the pattern I started by cutting a curved band that fit properly around the waist then worked from that point. Paper towels are great to use to develop patterns.

Her little sheep are next.
Thursday, November 29, 2012
A Change of Pace

Our local art club had a paint-in yesterday sponsored by Richeson art materials. Richeson donated 24 of their 5" x 7" gessoed hardboard panels as well as two nice gift certificates for Richeson products as awards for the paint-in. (Thank you very much, Richeson!) This is my painting.
The background is from a photo I took of the beautiful fall foliage on the crape myrtle in my yard. The sparrow is a composite of a few various sparrow photos I found on line.
It was difficult to get started on the painting because I hadn't decided what I was going to paint until yesterday morning just before I left home for the event. It was also a challenge because I didn't have as much time to spend on the drawing as I normally would.
But I am happy with the outcome. I finished 90% of it yesterday then took about a half an hour this afternoon to finish it off.
The border is Lumiere gold acrylic paint. It took several coats to cover the white gesso and in the future I will remember to underpaint with yellow ochre. The rest of the painting is Liquitex soft body acrylics which I like very much.
I like, and highly recommend, the Richeson gessoed panels. It is a very smooth panel, which won't be everyone's "cup of tea" but it worked beautifully with my thin applications of the soft body acrylics and the layering style I like to use.
Wednesday, November 28, 2012
The Shepherdess Gains Weight
She's going to have quite a nice outfit and it will be a shame to cover up her lovely body. But her tail will show. It would be nice to make clothes than can be removed, but her arms and legs simply aren't moveable enough for that.
Her little sheep will be needle-felted as well, and they won't be wearing any outfits. So that's where the needle-felting will show.
Fun, fun, fun!
Tuesday, November 27, 2012
Beginning the Kindly Shepherdess
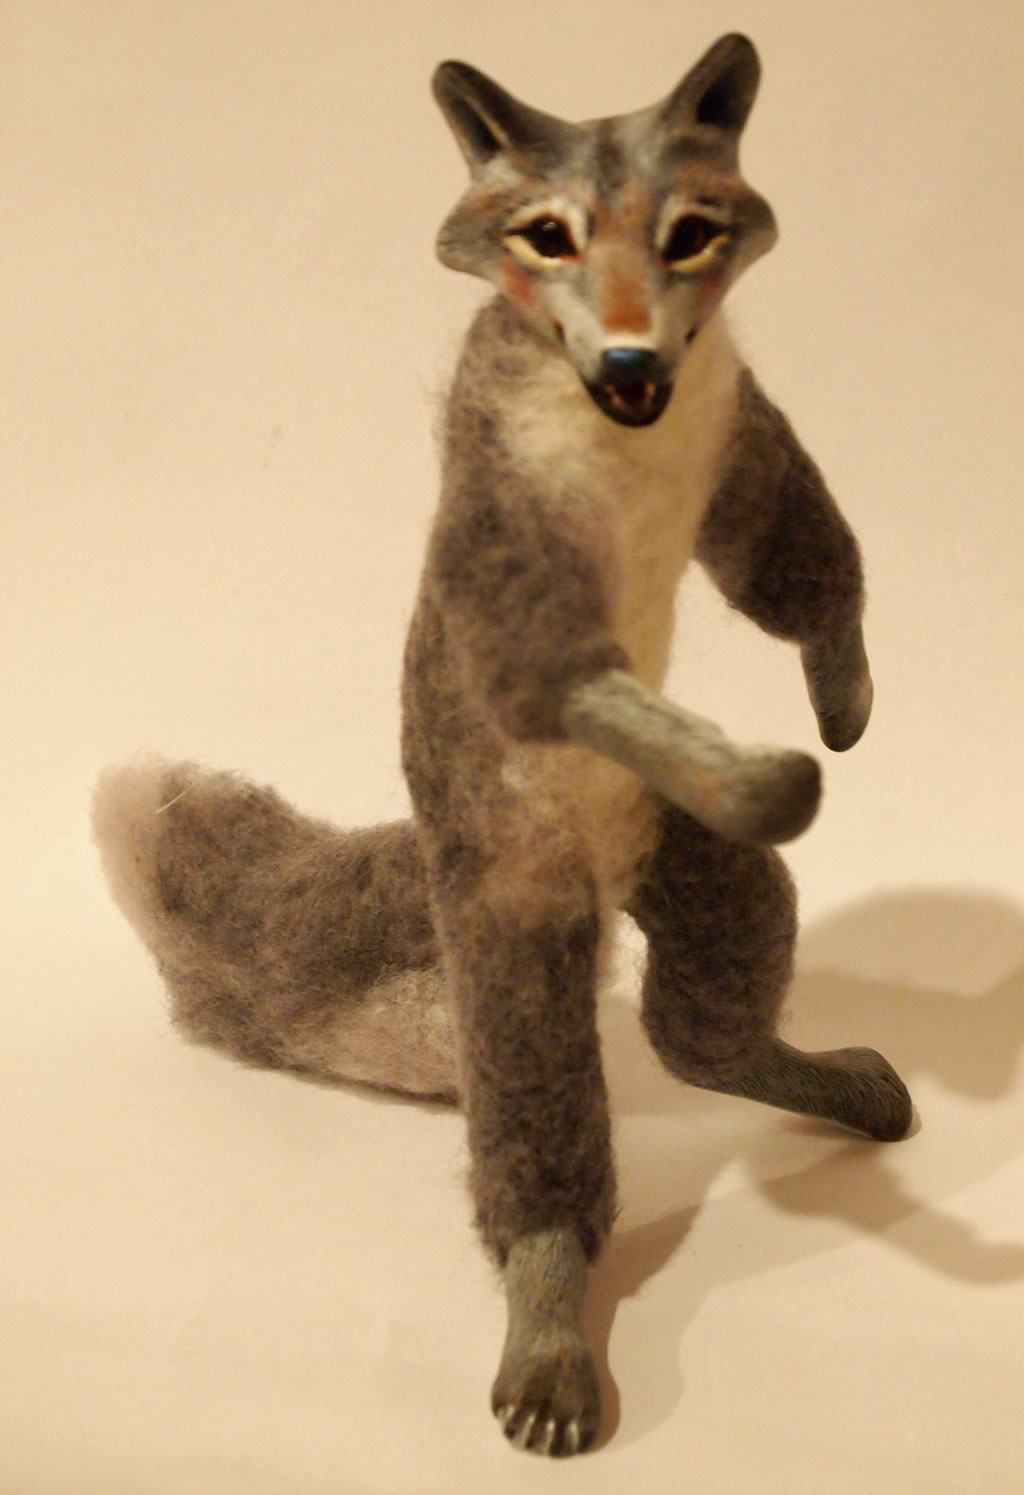
 I'm starting my next project - a kindly shepherdess character doll. She's a wolf and will have a small flock of two or three sheep.
Here's the first step - her head sculpted in polymer clay. I didn't worry too much about the clay color because I'm going to paint the whole head. The eyes are glass from http://www.glasseyesonline.com.
The teeth are also polymer clay. Ordinarily I would have cured them first then set them into the uncured head. But I worked with these teeth uncured and cured the head with the uncured teeth in it.
 Here's the painted head. I'm pleased with the way she turned out. I think she's quite a beautiful wolf.
 And here's the armature complete with head and paws. I worked carefully on this armature to get the pose I wanted. And only when I reached that point did I sculpt the paws. That way I was sure to get them in poses that would work with the overall pose.
She's be holding a shepheress's crook in her right front paw.
Monday, November 26, 2012
Santa's Pastry Chef

This is Jada, the Senior Pastry Chef at Santa's. Isn't she beautiful? She's talented too.
 This is the buche d'noel that she's made for a special Christmas Eve treat.
Making Jada was an exciting adventure. As usual, I sculpted her head, hands, and feet from polymer clay. The cake is also polymer clay, sprinkled with glitter! I've made one of these (real) cakes myself, and it's quite a job with the cake, filling, and meringue mushrooms. But it is certainly a special cake.
Her sweater and leggings are made from a sock. For the pantaloons, I reached back to my doily crocheting days. After finding a vintage pattern, I crocheted the edging, then made the pantaloons from silk fabric and edged the leg openings with the crocheted trim.
The chef's coat and hat are made from cotton as I thought it would be more appropriate than silk for "work" clothes. The red buttons are vintage glass that I found on eBay. They're faceted and quite beautiful. The "platter" that the cake is on is a vintage butter pat, another eBay find.
The skirt is red silk which I painted with gold dots once it was finished. It has five gores and five rhombus insets. Since the silk is fairly stiff it sticks out rather than draping. I think it looks a little bit like a pointsettia!
 I learned an important lesson while constructing Jada. I had the concept from the beginning, but I failed to consider the "engineering" from the beginning as well. It was very difficult to glue the platter and hands together, which was the last step in the whole process. I tried two-part epoxy and also E6000, both of which I have found to be very strong glues. But there just wasn't enough bonding surface. I finally solved the problem by forming small balls of polymer clay, pressing them firmly between the hands and platter, baking them, and then gluing the pads to the platter then to the hands. This gave me enough bonding surface. If I had thought of this problem in the beginning I may have come up with a better solution.
By the way, the hair was fun to do and, I think, successful. It's felted wool. I first felted a thin (about 1/4" thick) disc. Then I made each of the "cornrows" by separating a small bundle of wool, twisting it tightly, then releasing the tension to let it form a twist. At that point, I felted the ends to the disc. What I ended up with was a one-piece "wig" that I could hot-glue to her head.
Another "by the way" - the star on her cheek is a hot-fix embellishment from Kandi Corporation. It has hot melt glue on the back. All I had to do was press it in place on the un-cured clay and when I baked it, the heat melted the glue and set the star in place. I also used these stars on her polymer clay boots.
Tuesday, November 20, 2012
Snowball

The first day we'll sculpt the head, hands, and feet - boots in this case.
The second day we'll make the armature and construct and pad the doll form.
Then on the third day we'll make the clothes and add the hair. The jeans are simply made from denim scraps and a pair of fuzzy crew-type socks is perfect for making the sweater. We won't have time to knit the scarf and cap, but I'll give directions and for those who can't knit, I'll show how to make a cap to match the sweater from another part of the sock. By the way, she's holding a snowball made from polymer clay and coated with glitter.
I hope people sign up because it will be fun to teach.

Sunday, November 18, 2012
The Reindeer in His Finery

My little reindeer is now finished - all dressed up for the big day. Notice the Swarovski crystals on the tips of the antler points. The under-blanket is simple fleece with a blanket stitch embroidered border. The top blanket, though, is silk. It's padded and lined and also decorated with silk applique. I edged each silk applique piece with tiny glass seed beads. There are also seed beads around the edge of the silk blanket, and a small jingle bell hangs from each point. I think he's feeling quite proud!
Saturday, November 17, 2012
Polar Bear Bits Becomes a Polar Bear
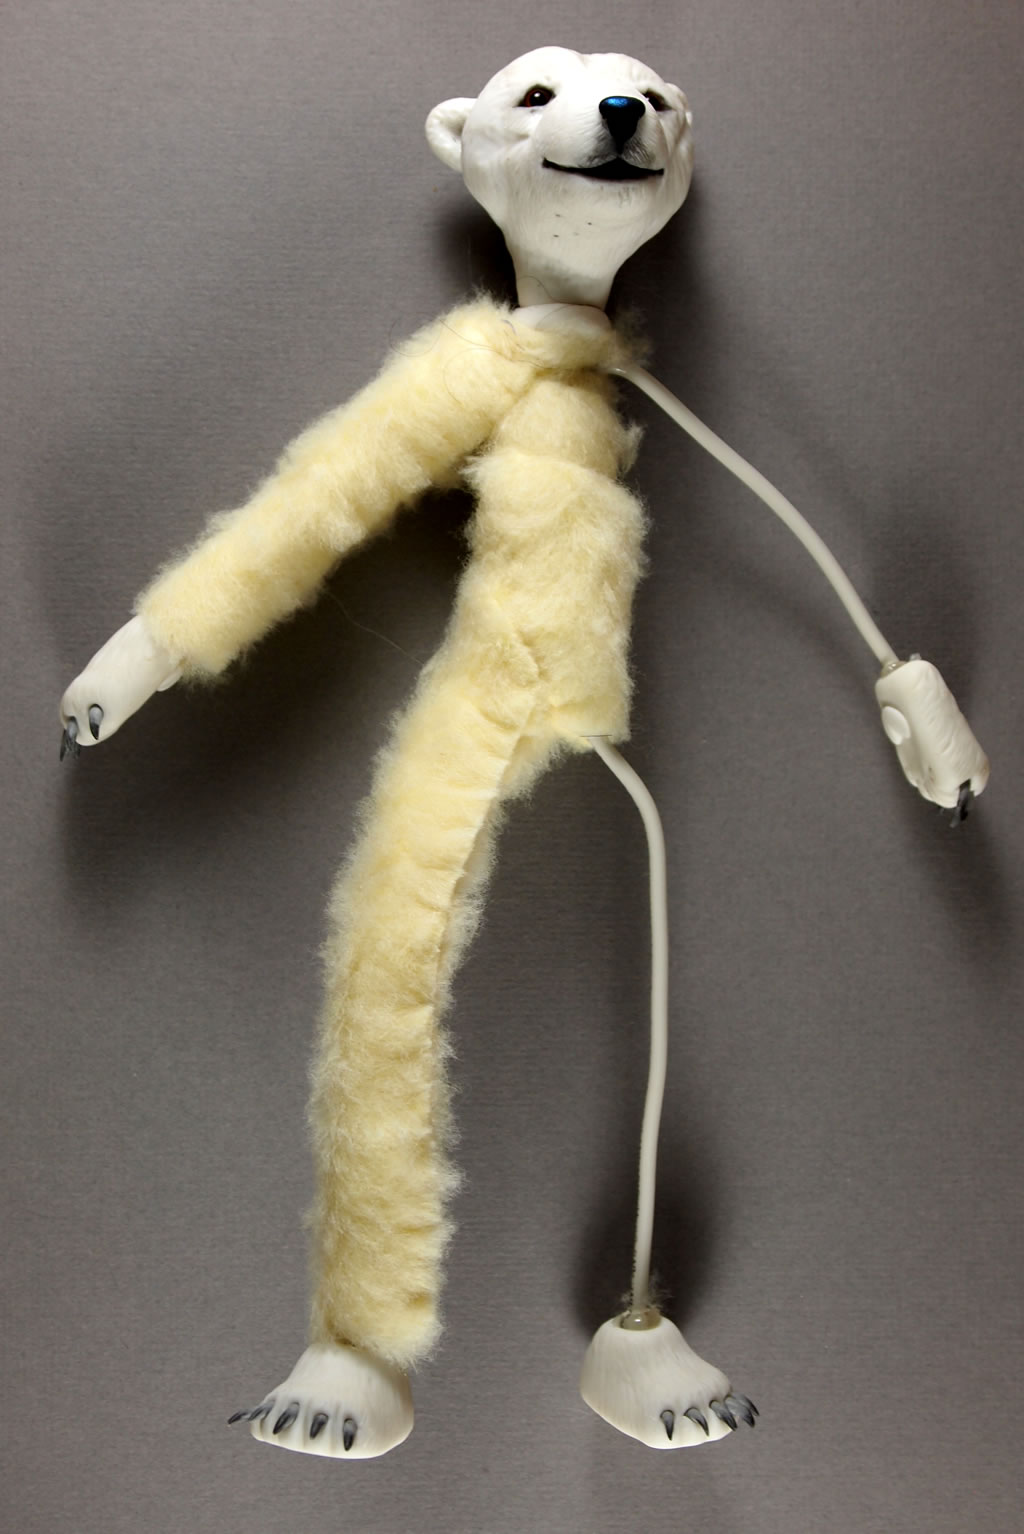
The first photo shows the wire armature on the right. And on the left, I've added wraps of plush wool felt and whip-stitched them in place.
After covering both sides with the felt, I began adding the wool. Just as I anticipated, the wool stuck much better to the wool felt than it did to the acrylic felt I used on the armature of the reindeer. So from now on, I'll use this plush wool felt over any armature I'm going to needle-felt over.
The second picture shows her completely needle-felted. I used a less expensive "core wool" from http://www.livingfelt.com for most of her. But I used Merino around the neck, wrists, and ankles because it's closer in color to the polymer clay.
My next step will be to dress her. But now that I see how lovely her little bear body is, I kind of hate to cover her up!

Thursday, November 15, 2012
Long Tall Sally is now Eveline

I outlined each petal shape for the skirt with tiny marcasite Charlotte beads and added beaded dangles with a quartz faceted drop at the points.
I especially like the sleeves which are puffed at the shoulders but slim at the wrists.
The shoes are polymer clay dusted with green interference mica powders for the shine. The hair is Cotswold wool curls. Her earrings are amethyst beads, and she's holding a colored marble.


By the way, "Eveline" is the name of the heroine in Sir Walter Scott's novel "The Betrothed."
Friday, November 9, 2012
Long Tall Sally

This is going to be a somewhat smaller doll, medium size actually, smaller that the Stable Elf but larger than the Elf with the Corgie.
After I glued the feet on, she looked sooooooo long and tall to me! Perhaps she will seem to shorten up once she's dressed. I have a costume in mind with a multi-colored silk skirt, silk velvet top, and lots of beading with tiny marcasite beads.
But though I have the costume in mind, I don't yet have a theme. Who is she? What is she doing?
Perhaps she should be a peacock elf. The colors I've chosen for her costume are definitely peacock colors and I just remembered that I have several small peacock feathers that could work into her costume somehow. But if she's a peacock elf, what is she doing? I'll have to think about it and see if I can develop that theme.
Thursday, November 8, 2012
Polar Bear Bits and Pieces

This little polar bear will be fun to dress. I have several patterned socks that I am considering for a sweater. But first I need to make the armature and felt him nice and fat - a task perhaps for tomorrow.
Wednesday, November 7, 2012
The Wayfarer


I dressed her in clothing that I hoped would evoke Sherwood Forest, but upscaled a bit with the embroidery on the sleeves and the fur-trimmed cloak.
This cloak turned out really well except that its quality doesn't really show like it should. I lined the hood and pointed details on the back (trimmed with rusty bells) with red silk, but it doesn't show. I should have lined the rest of the cloak as well and then I think it would have been pretty spectacular. Lesson learned. No skimping.
The walking stick is a branch from one of my climbing roses, de-thorned and with the bark whittled away. The little birds are polymer clay. Her hair is wool roving. I used tiny eyelets for scrap-booking on her bodice for the cording. I still want to add an ivy branch twining around the walking stick. Maybe I can make the leaves from silk stiffened with Mod Podge. We'll see.
Next the Reindeer Needs Her Raiment


Now I need to decorate her. I'm planning Swarovski red and green crystals topping the tips of her antlers, a bow with bell for her neck, and a gorgeous beaded and embroidered blanket in red, white, and gold. I'd like to also add leg wraps but I'm in a bit of a quandry as to what to make them from.
The only thing I wish I had done differently was to make her antlers a bit more delicate. Next time... Also, as a potential improvement, next time I'll try wrapping the armature with wool felt and see if the felting sticks better to it.

Tuesday, November 6, 2012
Beginning the Reindeer

I made the antlers from polymer clay, and included a base with a hole that the armature wire could go through. For the wire I used 12 gauge single strand insulated electrical wire. The insulating is a nicer surface to work with than just bare wire. As you can see from the picture, I then wrapped the wire with strips of felt and sewed them in place. Now I'm ready for the felting.
By the way, I also formed the polymer clay antlers over an armature. I made that one from 16 gauge copper wire and wrapped the wire snuggly with florist's tape so that the clay would have something to grab on to.
Stable Elf

I made the body with the same fabric I was planning to use for the sleeves so I didn't have the make a blouse.
The jodpurs are dupioni silk with ultrasuede patches to reduce chafing when she rides!
Her vest is faux fur and in the back has two long tails - split to spill nicely over the reindeer's back - ending in gold bells.
And for the jeweled decoration, I finally found a good home for a treasured but broken Christmas pin that a friend gave me about 20 years ago. It really feels good to be using it here.
Her hair is essentiall a cap I made of faux fur - the same faux fur I used to trim the Wayfarer's cloak.
Oh, and the buckles on her riding boots are salvaged from an old pair of shoes.
My favorite detail is the pearls I glued on the puffed part of the sleeves to echo the tiny pearls on the pin. I think it's really elegant. I've ordered two vintage red glass drops for her earrings from an Etsy shop that I like very much, Yummy Treasures. Can't wait till they arrive!

Market Day Bunny

I felted the body around a pipe cleaner core. That worked well enough everywhere except where the felting joins the polymer paws. I glued the pipe cleaner ends into holes in the wrists and ankles, but no matter how much I compacted the felting around the joints, they just flopped around. The only way I could think of to solve the problem was to completely encase the joints in lots of hot glue (which dried stiff). So now those joints aren't floppy any more, but they're ugly. Fortunately they're hidden under the clothes, but I don't like ugly details even if they are hidden away. So no more pipe cleaners. I'll use stiff wire from now on.
I made the hoodie from an old sock with a really cute tiny garden pattern. The pantaloons are made from a vintage hankie with hand-crocheted lace trim. And the skirt is made from an old shirt that I match-stick pleated then aged in a bath of strong tea.
I made the purse from Ultrasuede and the button on it is made from polymer clay (a very handy tool for making tiny buttons in any color you want!).

Corgi Gets a Treat

Her hair is a cap I crocheted from Lion Brand Fun fur, an eyelash yarn that comes in lots of nice colors. Its unkempt look is a favorite of mine and, I must admit, mimics my own hair "style!"
The bulge you see around her middle is the gripper part of the stand. I just got this cheapie stand from Michaels and I need to find (or make) some nicer ones. These just detract from the quality of work on the doll herself.
Anyway, the vest is ultrasuede that I did a lot of beading on. The points are tipped with tiny gold bells. It's closed with a beautiful vintage glass cabochon that I glued on. It has a lovely knotted design in gold that is reminiscent of a Celtic knot. So, of course, she needs a Welsh Corgi and a star would surely indicate the dog's magical powers.

When I work with light color polymer clay I have a lot of trouble with transferring dirt and dust particles to the clay, but the Puppen seems to magically "lose" them during the curing! Yea!
By the way, the pants are a gorgeous deep red silk velvet that I bought as a fat quarter on eBay. And the final touches were the ankle bracelet made from tiny gold Charlotte beads and the two feathers in her hair - feathers from my very own ducks!

Friday, October 19, 2012
Something New, Something More!

Meanwhile, I went to a wonderful class over the weekend. DollWorks in Sacramento sponsored a class by one of their members, Judy Barclift, whose creations are amazing. I attended the class because I had long been interested in making animal dolls and thought this would be a perfect opportunity to find out about construction. The topic was witches, which (no pun intended) I'm not much into. But I had a super time in spite of that and enjoyed making my own character, Bat Woman.
I had so much creative fun fashioning Bat Woman following Judy's clear and helpful lead. (I should say that although Judy walked us through her process of sculpting head, hands, and feet, and constructing the doll, she left creating the characters up to each one of us).

Dressing her had me using several techniques. I made her vest from black felt, hand painted it with iridescent fabric paints, and sewed beautiful glass beads around the edges. The glass beads are covered with an iridescent blue/green/purple coating which gives them a gorgeous sheen and picks up the colors of the painted lapel, swirls, and stars on the rest of the vest. Her dress is an unusual bluish gray fabric with an unusual texture and a fabulous soft drape. I made a rosette of the fabric, centered it with a glittery bat button, and used it to add interest to the hemline. Exotic ruffles made from selvage strips of a gauzy crumped fabric accent the cuffs and neckline. She has demure black silk pantaloons trimmed with small bows.

Although I had great fun making her and have already nearly completed another because I'm so hooked on the process, I feel differently about these dolls that I do about most of my other creations - for some reason although I like them I'm willing to part with them. I've just listed Bat Woman in my Etsy shop and I hope she sells as it would be nice to have the funds to donate to the animals.
Wednesday, October 10, 2012
Cutest Squirrel

Someone saw the bead I made and donated to Fire Mountain Gem's breast cancer fundraiser on their website and contacted me. The one she saw was sold and she wanted to know if I would make another. Sure! The wire with the spiral ends just shows the direction of the hole.
As with all my little polymer animals, he was so fun to make. I'm going to make another one for my Etsy shop.


Murals in Situ


I am grateful to Sharon and the Fair Board for the opportunity to create these. It was a welcome - though sometimes disconcerting - stretch for me, an opportunity to raise some money for the animals at Fat Kitty City and Idaho Black Bear Rehab, and a confirmation of my work. It was also a confirmation of my belief that when you "get out there" things come back to you in some form or other.
This project gave me confidence in painting big and in working with acrylics. In fact, I'm going to work on a painting for the call from our local hospital. They are opening a new wing and are looking for art by local artists. It will be competitive, but worth a try.
Anyway, a chapter well ended.
Subscribe to:
Posts (Atom)