Tuesday, July 16, 2013

3X3 First Phase

 
This is my first report on my 3x3 pieces for this year's 3D and 3X3 show. My concept is a bit sketchy at this stage, but I wanted the bases of all of them to be collage incorporating several tea-related elements. So I've included tea-bas covers and tags, a label from an iced-tea bottle, and magazine snippets portraying some of the ingredients in the flavored teas, like peach or lemon. I've also included pieces of hand-written vintage recipe cards that I got on Etsy.com as well as some simple text for texture.
I prepared my board with spray primer that I got at Home Depot then went directly to the collage using Liquitex matt gel medium for the adhesive. Where I wanted to tone down the colors, I added light washes of gesso. Then I added splotches of color here and there with alcohol inks.
But now what? Well, that requires some thinking time...

Monday, July 15, 2013

Not Like Me!


This is a little ACEO I did about a month ago.  The subject is unlike what I usually do.  But it was an interesting challenge to try to get the effect of the water.  It took lots of layering so it's a good think I'm a patient person!  I think I did a pretty good job with the water, but perhaps the perspective on the bubbles isn't quite right.  Perhaps they shouldn't be so round since they're seen from an angle.
 
When I listed it on eBay I thought it had a good change of selling because I think this subject is popular.  Also, despite the question on the bubble perspective, I think I did a reasonably good job on it, although maybe the markings on the fish should have been more interesting and the colors should have been brighter.  Anyway, there were lots of watchers but no buyers, so I had to relist it.  In fact, I think I listed it four times before I sold it.  With each listing there were 4 or 5 watches, but the bidders were slow to materialize.  My sister tells me that summer can be quite a slow time for eBay and I am certainly finding it so.  Fortunately, selling them isn't the main point - it's the  joy of painting them.

Friday, July 12, 2013

Chickens!


In honor of my new chickens I started making these little chicken characters from paper clay.  They're small - about 1 3/4" tall.  So far I've only gotten around to painting the one.  My intention is to keep the painting on all of them quite minimal.  Do you like her glasses?  I made them from rusted wire (to match the feet) and they have stylish star-shaped rhinestones on the sides.

The crown on the second one is from a metal bird that I didn't finish at a metal-working class.  I think it works fine here!

I have noticed two things about my own chickens who arrived as day-old chicks.  The first is how fast they grow.  And the second is how big their feet are - a handy feature for getting the little sculptures to stand properly!

Thursday, July 11, 2013

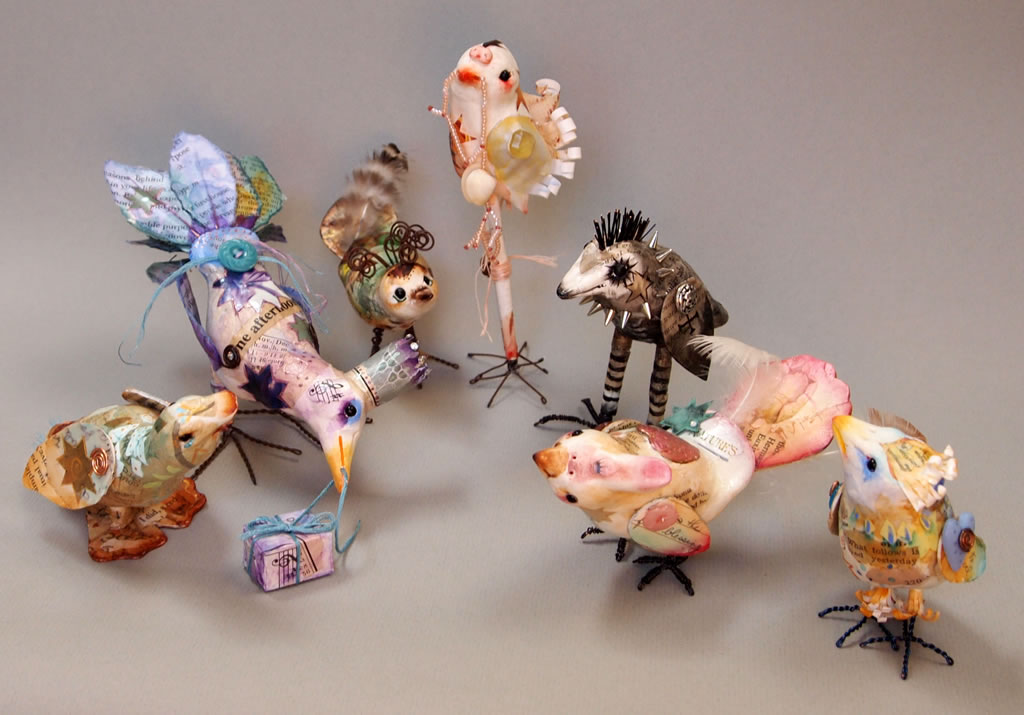
A Flock of Burdz


I just had to try paper clay and these are my initial results.  I call them "Burdz."  As you can tell from the photo, these are imaginary birds, and any resemblance to actual birds is purely coincidental!

I form each bird by simply shaping a ball of paper clay.  The birds are small enough - the bodies are about 1 1/2" high - that I haven't felt the need for a crumpled aluminum foil or Styrofoam core.  I add the eyes while the clay is wet.  The first one I made isn't in this photo because her eyes were too buggy.  After that, I was careful to press the glass beads that I use for the eyes well into the head.

I also press the legs in place while the clay is wet.  But this is just to make the placement hole.  After the bodies are dry I glue the legs into those holes.

The legs on the shorter birds are just twisted wire.  But for the taller birds I used tight coils of paper and glued the wire feet into the ends.

Most often I make the wing shapes out of two thicknesses of mixed media paper glued together with spray adhesive. 

It takes at least a day, and more likely two, for the clay to dry completely.  Then I'm ready to decorate.  I use acrylic matt medium to decoupage various paper bits on the body and wings.  Then I add the painting and glue the wings and any trim pieces in place. 

I think my favorite is the Goth bird.  But, actually, my favorite changes from day to day!

Tuesday, July 9, 2013

Making Canvas Covered Journals


A few months ago I spent an afternoon with the latest issue of "Pages" magazine from Interweave.  I had never been interested in making books, but I had a couple of hours to kill and this magazine was the only time-killer at hand.

When I first saw the article on canvas-covered journals I skipped right by it.  The examples did not seem compelling to me.  But after flipping by the article a few times, I saw the journals in a different light - "It's the canvas, stupid!"  The canvas covers on these journals makes them a perfect project for a painter.  Suddenly, I couldn't wait to get home and make one.

The one in the center was my first attempt.  I was just doodling with the paint, basically, and having fun.  Well, every step of making the journal was fun: preparing the signatures (groups of pages that are sewn in as one), sewing them in, and putting on the button closure.  I modified the procedure the article laid out.  I added more stitches for the signatures, and embellished the stitching with buttons.

Soon I was searching Etsy to expand my button collection.  I ordered better paper than the copy paper I used for the first one.  And I was making more and more journals.  One of my favorites is the one on the lower left.  I painted the entire cover - front and back - as a continuous landscape painting.  The more I worked, the more possibilities I saw.

I have made several more of these journals and will soon begin listing them on Etsy.  Making them is so addictive, but there only so many I can use myself!

Monday, July 8, 2013


Here's a little ACEO I'm pretty proud of.   The three young cottontails are all snug in their grassy nest lined with mom's soft fur.

After blocking in basic background colors and painting the rabbits, I deepened the darks directly around then the stippled the next fur.  For the foreground I switched from soft-body acrylics to acrylic gouache.

It sold pretty quickly on eBay but I was sad to let it go.  I hope it brings joy to the person who bought it.

Sunday, July 7, 2013

Cerrunnos, the Completed Fox Totem


I've been quiet for so long that it's going to be somewhere between difficult and impossible to catch up, and things won't be in the order created, but here goes!

Here's the finished fox totem which I've named Cerrunnos.  Cerrunnos is the Celtic Lord of the Forest and is typically portrayed as a stag.  But, hey, I'm all about foxes!  Just to give a nod to tradition, he has stag horns (which I made of rusted wire).  There is a pine cone (polymer clay) n the niche in his chest.  An owl gazes wisely from his forehead, a squirrel sits on his leg, and a little snake slithers along his tail.

The decoration is primarily a collage of various printed text from old books.  Most is illegible because of overlays and swatches of paint and gesso. But there are excerpts on his chest that are perfectly readable - snippets from a vintage dictionary which are nice little line drawings of various forest animals and accompanying text.

This piece was an impulsive experiment, inspired by the shape of a lotion bottle.  The one thing I wish I had done differently was disguise the underlying form.  Next time......