I'm happy to see you here and have you join me on my artistic journey. Over the past several years I've created visual art in various media. But beginning in 2019 I am focusing on writing and illustrating books for animal enthusiasts of all ages. Regardless of the medium, my subject is nearly always animals! Don't miss a post! Submit your e-mail address just below and you'll receive new posts directly in your mail box! I post once - or at most twice - a week.
Friday, August 9, 2013
A Literary Parrot
I was showing my daughter how to make the canvas covered journals and made this one. I used her paints which are the tube acrylics rather than the soft body ones I usually paint with. I followed my usual procedure, rag-rolling a couple of layers for the background then painting in the details - a rough suggestion of tropical foliage. I then turned to the varnish, brushing it on then smoothing it with back-and-forth brush strokes.
I wasn't paying that much attention to what I was doing, but when I did look a bit more closely at my canvas I realized that my brush strokes with the varnish were actually lifting paint - yikes!
My daughter suggested that I was achieving a nice, if unintended, aged look, almost as though the years and the blowing sand from the nearby imagined beach had picked away at the painting. With nothing I could do to repair the damage, I decided I liked the look.
But the lesson was clear - don't rush it! Let the paint layers dry. I tend to be a bit impatient, and this time the thicker paint was not so forgiving - and not so fast-drying - as the soft body. Lesson learned? I hope so!
Thursday, August 8, 2013
The Frog Armature
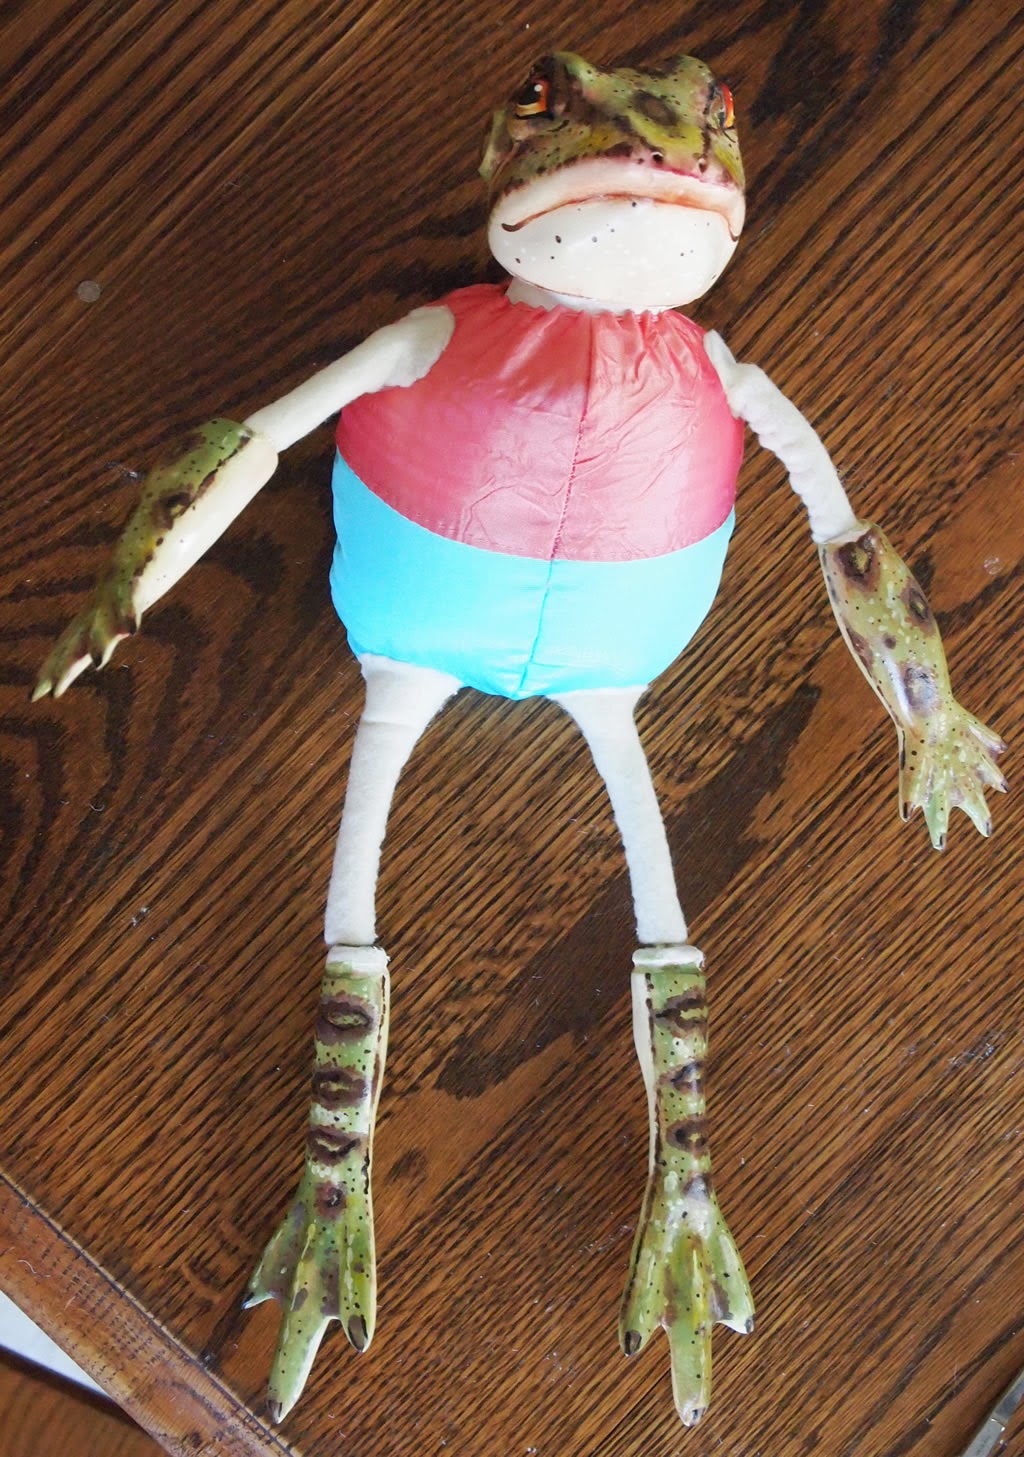
I've completed the armature and my frog is now ready to be dressed in her fairy outfit. Here's how I made the armature.
The body is stuffed fabric. I used the fabrics I intend to use for the outfit - the coral pink for the top and the turquoise for the bottom.
Three 12 gauge single strand plastic coated electrical wires form the "skeleton" of the armature. One wire is the neck, spine, and left leg. The second wire is the spine and right leg. I wrapped these two together along the spine portions with 22 gauge craft wire then secured the wrapping with hot glue. The third wire goes crosswise through the body for the arms and shoulders.
When I sewed the body pieces together I left an opening in the back for stuffing, I cut tiny holes for threading the wires for the arms and legs.
I began the assembly by running a gathering stitch around the hemmed neck edge of the body and tying it tightly to attach the body to the neck. (When I sculpted the head, I made a deep groove in the neck to accept the cloth body.) Then I inserted the spine/legs wires through the opening in the back of the body and threaded them through the small leg holes I had cut in the body. I pulled the leg wires downward as far as I could to allow me some wiggle room for inserted the neck wire into the hole I had made in the bottom of the head, and I used hot glue to secure the head to the neck wire. Finally, I inserted the arm wire into the body through one of the holes I cut for the arm wire, pushed it through the body, and out the opposite arm wire hole.
Then it was on to the stuffing. I stuffed it pretty full so it would nice and sturdy, then stitched up the opening in the back of the body.
When I initially cut the wires for the arms and legs I made them longer than I thought I would need them, so now it was time to figure out how long I really wanted them and trim them to length. I attached the lower arms/hands and lower legs/feet to the wires with hot glue.
My final step was to stitch wrappings of felt strips around the upper arms and upper legs. Since these areas are going to be covered with sleeves and pant legs I suppose the felt isn't strictly necessary. But it adds a nice bit a bulk and, now that I think of it, prevents the arm wire from shifting back and forth.
Wednesday, August 7, 2013
Painted Frog Bits
Now I'm nearly done painting the frog. The head is finished, as is the arm at the top of the picture. The legs and other arm I left partially finished to show the process I used to paint the frog's markings.
The first step is shown in the leg that is lowest in the photo. I've painted the top side green and the under side cream. The only thing I've been somewhat careful about is the transition between the two colors, making sure it's right down the side. The green paint is pretty splotchy but it doesn't matter. In fact, it's good because in the end it will give the markings more variation.
The arm, next higher in the photo, shows the second step. I've used a medium brown to paint in the major markings. I used an old, small round bristle brush and a tapping stroke to get very uneven edges to my strokes. Notice that on the larger makings I've left the centers green, and that on the leg the rings are elongated all across the front of the leg, almost looking like stripes. I've used photos of leopard frogs for reference.
The next step, shown on the leg that's second from the top, is to add washes - burnt sienna over both the upper and lower sides, and a tiny bit of yellow here and there over the green side for a bit more color variation. The burnt sienna wash on the lower, cream-colored side is very light, just giving a hint of a bit more warmth. It's a bit heavier, and more uneven, on the green side. Here the burnt sienna serves to tone down the green, since burnt sienna is a reddish brown and therefore a near compliment to the green.
The final step, shown in the top arm, is to add more color and texture. I darkened the rings with burnt umber then again with a bit of dark burnt umber here and there. Each time I added a darker color, I confined it to the center area of the lighter color Iwas painting over. I added a few splotches of a very light yellow green on the green side of the ankles/wrists and hands/feet. I also added uneven stripes of small splotches along the center of each digit to heighten the modeling effect. Then I used the tip of my liner brush to add small dots. On the green side, I used burnt umber and a metallic yellow green and metallic rust. On the cream side, I just used burnt umber.
Throughout the painting I was intentionally pretty sloppy as I'm striving for an organic look. Painting in layers this way, the whole thing looks pretty bad until the very end when things fall into place.
Tuesday, August 6, 2013
Frog Bits
The pieces of the frog doll are now ready to paint. On the last paper clay piece I worked on - the two ducks and the beggar frog - I gessoed the paper clay before I painted it. The painted surface turned out a bit rough and I figure there were two possible causes for that. One is that I didn't sand it with a fine enough grit sandpaper. I think I didn't go beyond 220. But the other possibility is that the moisture in the gesso may have slightly softened - and roughened - the surface of the dry paper clay.
So this time I made a couple of changes. First, I sanded with 220 grit, then 400 grit, and finally 600 grit. When I was done sanding it was quite smooth and I wanted to keep it that way. So instead of using gesso as an undercoat for the painting I used Krylon spray Workable Fixatif. Once the fixative was dry, the surface was still very smooth. So I've got quite a nice base for the painting.
The thing I liked so much about the gesso was that it was such a nice surface to paint on. Floating was a dream! We'll just have to see how it goes on this surface.
Monday, August 5, 2013
A Frog Obsession?
Here I am, working on another frog. I have to admit that the last one was very inspiring. But this one has a special purpose - it's for my new little granddaughter, Sophie. Hopefully her mom and dad will hang it by her crib. Some day she may be interested in the process it took to come into being, so here goes.
This doll is going to have a beautiful fairy costume and wings and is intended to hang. I'm making her head, hands, and feet from paper clay. The finished sculpted head is in the upper left corner of the photo. I carved the core of the head from styrofoam then wrapped it in gauze and coated the gauze with Mod Podge. The Mod Podge gives the paper clay something to stick to.
Now I'm starting the hands. As you can see from the one on the right, the core is cardboard from a cereal box. The lower arm is a roll of cardboard held in place with glue. I really like Alene's Fast Grab tacky glue for this. It really does grab fast, and dries pretty fast as well. I then cut little slits in either side of one end of the tube. I cut the basic hand shape from more cardboard then set it in place in the slit with more glue. From there, I can work the paper clay directly over the cardboard. I dampen both the clay and the cardboard before I press the clay on, and it sticks quite well. I've put a layer of clay over the hand on the left, adding it in small snake shapes that I then smoothed into each other.
Sculpting the clay can be a somewhat slow process because it needs to dry between the layers. Not only does working in relatively thin (about 1/4" or so) make for better sculpting, but it seems to crack less. In fact, I seldom have cracks, but if I do, I can easily fill them with paper clay.
Friday, August 2, 2013
Poor Beggar Frog
My little Poor Beggar Frog now has an outfit. I was torn between two options for this little guy - the poor beggar frog or the itinerant merchant frog. The good news is that his cloak is removable so he could actually switch personnae at some point in the future.
As you may be able to tell, making the grungy cloak was really an adventure. It started out as a pair of linen/rayon slacks that I hadn't worn in about 10 years, so it was definitely time to "repurpose" them.
Per my usual method of making clothes for my doll characters, I first made a pattern with a paper towel, taped the seams together, and fit it from there. With a fair amount of confidence in the pattern I made I proceeded to make the cloak from the slacks fabric.
As you may be able to guess, dirtying up the cloak was the most fun. I scraped at the fabric with sandpaper and a knife, pulled along the edges to fray them, then cut and punched holes. Next I dampened the cloak, crumpled it up, and dabbed it in various shades of brown watercolor. Once it was dry, I caught a few of the folds - particularly at the corners of the hood - in place with tacking stitches.
A walking stick cut from a small tree branch, peeled of its bark, and dipped in brown paint for the dirt, completes the look!
I love my little Poor Beggar Frog!
Thursday, August 1, 2013
Duck Shoes
Or, I should say "sandals." Having finished her plumage, it's on to her costume as the Lady of the Lake's attendant. Because I would like much of this painting to show she's most likely to be wearing only a whimple (medieval head scarf). So she definitely needs some other little touches to keep up the visual interest.
To solve this problem, I came up with the idea of shoes. I think maybe they would have worn sandals in those days, and I must say it was fun to design a sandal for a duck's foot!
I used Ultrasuede, the plastic from a Cool Whip lid (such a sacrifice that I had to finish the Cool Whip so I could use the lid!), embroidery thread, and small metal buttons.
My first step was to trace the outline of the feet onto the plastic and cut them out as stiffener for the soles. I then cut two pieces of Ultrasuede for each shoe, about 1/16" bigger all around than the plastic.
I made twisted cords from the embroidery thread for the ties. And I also used thin strips of Ultrasuede to made loops on the soles near the heels to run the cords through. After gluing the Ultrasuede loops and the two cord ends in place on the plastic - the Ultrasuede loops on either side of the heel and the cord ends between the front toes - I dabbed a bit of glue on either side of the plastic and pressed the Ultrasuede sole pieces in place sandwiching the plastic between them. To give the sandals a finished look and keep the Ultrasuede/plastic/Ultrasuede sandwich firmly intact I whip-stitched all around the edge with two strands of the same embroidery thread I used for the cords. That's what the 1/16" margin on the Ultrasuede pieces was for.
I threaded the two cord ends through the shank on the button, then ran one through the loop on one side of the heel and the other through the loop on the other side of the heel. Then I could slip the sandals on her feet, wrap the cord ends around her leg, and tie them in place.
Doesn't she look stylish? I think these sandals were quite successful. The only improvement I can think of is to give the soles a slightly raised heel - perhaps of paper clay or polymer clay. But her feet would have to be shaped a bit differently for that - not perfectly flat - so I'd have to plan for it from the sculpting stage. And planning ahead doesn't seem to be my strong suit.......
Subscribe to:
Posts (Atom)