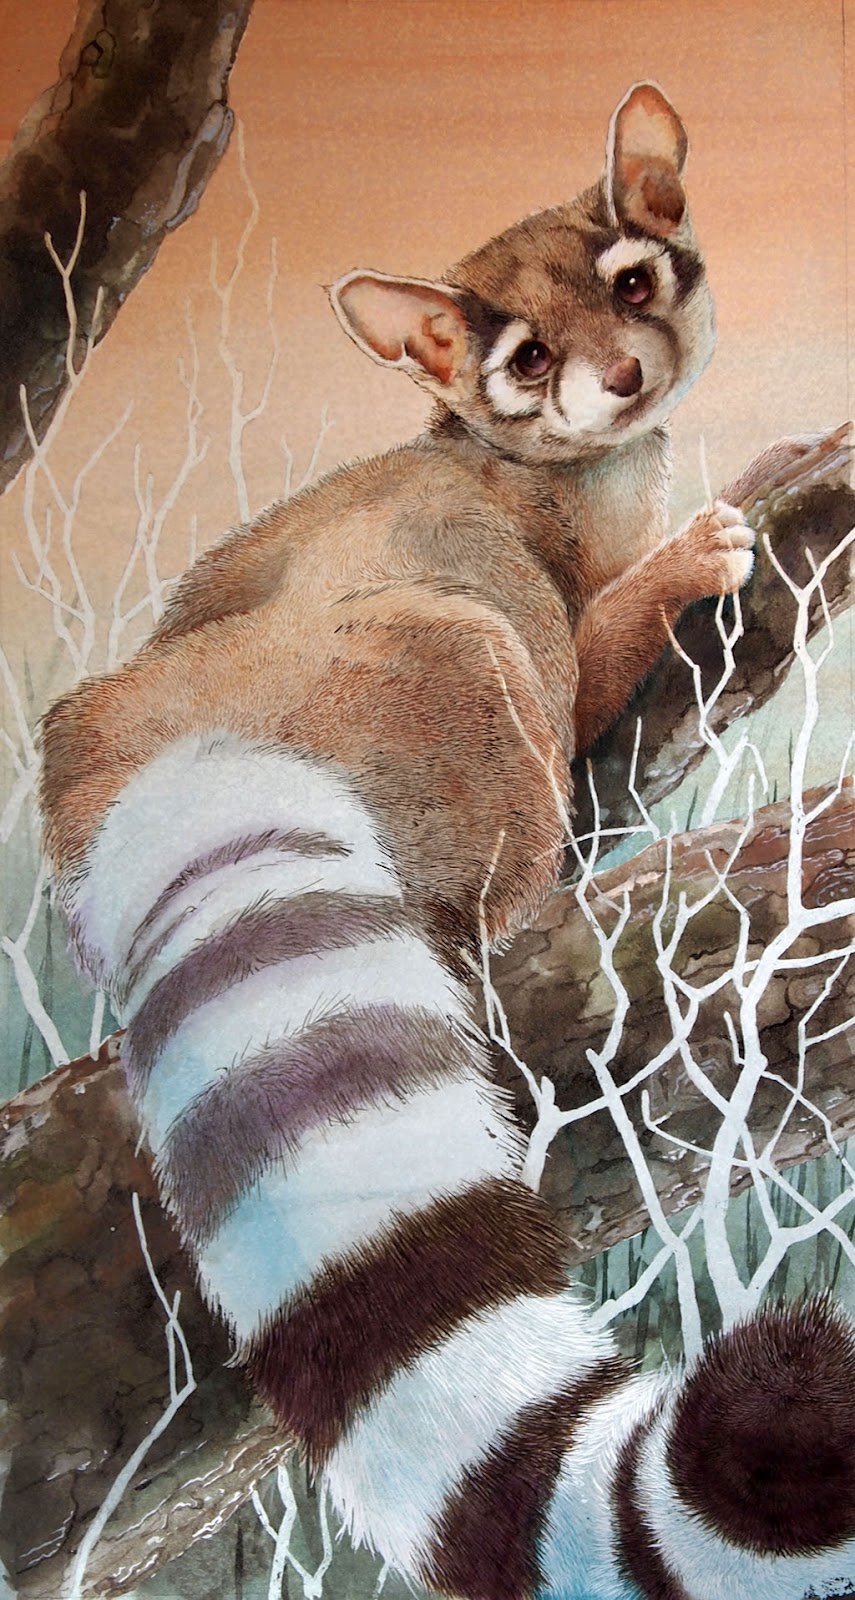
My lights and shadows seemed much more pronounced in my painting than they do in the photo. But I think that just means that I need to deepen my shadows. And I see that I have the highlights in the wrong place on the tail. For the tail, it looks like the light source is directly above, but for the rest of Lucy, it's to the upper left.
Before I looked at the photo here on the computer I thought I was ready to go on to the Cactus Wrens and get them to the same point then come back for the foreground branches on both. But now I see I have a lot more work to do here.
I want more dramatic light and softer looking fur! And I think I need to carry the dark stripes further upwards on Lucy's taill. So, my work for tomorrow is cut out for me!
I'm happy to see you here and have you join me on my artistic journey. Over the past several years I've created visual art in various media. But beginning in 2019 I am focusing on writing and illustrating books for animal enthusiasts of all ages. Regardless of the medium, my subject is nearly always animals! Don't miss a post! Submit your e-mail address just below and you'll receive new posts directly in your mail box! I post once - or at most twice - a week.
Sunday, April 29, 2012
Saturday, April 28, 2012
More Fur
My ringtail cat needs a name, and I think it will be "Lucy."
Today I continued on this piece by painting more fur. I'm only using two kinds of brushes and brushstrokes - a #1 liner for tiny lines and #10 flat for washes. It's tedious work, but I enjoy it. It seems like it would take forever to cover Lucy with little lines, but it really doesn't. It's satisfying to see her taking shape bit by bit.
Friday, April 27, 2012
Back to the Ringtail
After polymer, gourd, and basket detours I am finally back to my ringtail cat and cactus wrens piece. I am now at the point where I can continue with them separately as the backgrounds are pretty well established and flow nicely into each other.
So today I worked on the face. I was happy with it until I stood back to take the photo and realized that my light source may be confused. I am working from several separate reference photos of ringtails and each has a different light source. And, to make things a bit dicier, the coloring on the animals shows individual variation that is pretty significant.
Anyway, the light source on the painting so far seems to be above and to the left - at 10 o'clock I'd say. So I need to check both backgrounds and be sure that they're consistent with that. Then I'm going to cut a bright orange sticky note arrow and put it on this painting to constantly remind me as I work.
It felt good to be painting again.
Thursday, April 26, 2012
A New Form of Canid
Wolf or Fox? Both, and neither.
The other day I got the urge to make a pine needle basket. It's been two years since I took a half-day workshop on the subject, but remembered pretty well how to do it. And I had a box full of pine needles that I collected from our downed trees just after the December 2009 snow storm. The work seemed to go a little faster than I remembered, but still I worked on this piece over the course of four days.
Afyter finishing the basket yesterday afternoon I started on the polymer clay animal for the top. I wanted a wolf, and gathered a few reference photos. I'm happy with the modelling, but the color was impossible! A wolf's coat is so complicated with hairs tipped in different colors than the bases. And there's really a lot of beautiful pattern though much of it is subtle. So I decided to try to capture the colors in paint rather than in the polymer clay itself - an approach I almost never take! Because the undercoat was reddish, I used that color of polymer, fading to cream on the feet, belly, and muzzle.
As far as the wolf goes, my concept was firm, but my execution left a lot to be desired. I just couldn't get the colors right. Because of the color of the clay, it was tempting to turn him into a fox, but I didn't have a white tip on the tail and the feet weren't black. A fox would probably have been more successful. But I ended up with an unidentifiable, but pretty cute, canid!
The clasp is an antique button with a knotted raffia loop. The hinge is a piece of ultrasuede that I glued to the inside of the base and lid. Of course I couldn't resist adding a little beading. And my signature - doesn't show in the photo - is a little polymer leaf shape stamped with my name, brushed with antique copper mica powder, and glued to the inside bottom. I really like that little signature stamp!
Despite the problems with the animal, I'm happy with this piece.
The other day I got the urge to make a pine needle basket. It's been two years since I took a half-day workshop on the subject, but remembered pretty well how to do it. And I had a box full of pine needles that I collected from our downed trees just after the December 2009 snow storm. The work seemed to go a little faster than I remembered, but still I worked on this piece over the course of four days.
Afyter finishing the basket yesterday afternoon I started on the polymer clay animal for the top. I wanted a wolf, and gathered a few reference photos. I'm happy with the modelling, but the color was impossible! A wolf's coat is so complicated with hairs tipped in different colors than the bases. And there's really a lot of beautiful pattern though much of it is subtle. So I decided to try to capture the colors in paint rather than in the polymer clay itself - an approach I almost never take! Because the undercoat was reddish, I used that color of polymer, fading to cream on the feet, belly, and muzzle.
As far as the wolf goes, my concept was firm, but my execution left a lot to be desired. I just couldn't get the colors right. Because of the color of the clay, it was tempting to turn him into a fox, but I didn't have a white tip on the tail and the feet weren't black. A fox would probably have been more successful. But I ended up with an unidentifiable, but pretty cute, canid!
The clasp is an antique button with a knotted raffia loop. The hinge is a piece of ultrasuede that I glued to the inside of the base and lid. Of course I couldn't resist adding a little beading. And my signature - doesn't show in the photo - is a little polymer leaf shape stamped with my name, brushed with antique copper mica powder, and glued to the inside bottom. I really like that little signature stamp!
Despite the problems with the animal, I'm happy with this piece.
Wednesday, April 25, 2012
Plaisir d'Amour
I made this piece a few weeks ago but haven't written about it yet. I was planning to once again apply to the Society of Animals Artists, but this time with my polymer clay pieces - miniature sculptures as well as jewelry. One of my favorite necklaces, "Trans-pea-tation" is based around the theme of little rabbits riding in a peapod. But it wasn't appropriate for the SAA application because it included a lot of glass beads and crystals. So I made this little sculpture on a similar theme.
Since the shape of the peapod is similar to a gondola, I decided to make the rabbits lovers - the girl a lop-eared with her ears long and romantic, like long tresses. The peapod boat has a canopy of pea leaves and a pea flower. The base is a piece of redwood burl that I cut from a slab I bought long ago. The grain resembles the swirling of water though the grain doesn't show up as much as I'd like.
The little sculpture is about 3" tall.
As for the SAA application, it turns out that I've missed the application deadline. Oh, well. Probably would have just been rejected again anyway!
Since the shape of the peapod is similar to a gondola, I decided to make the rabbits lovers - the girl a lop-eared with her ears long and romantic, like long tresses. The peapod boat has a canopy of pea leaves and a pea flower. The base is a piece of redwood burl that I cut from a slab I bought long ago. The grain resembles the swirling of water though the grain doesn't show up as much as I'd like.
The little sculpture is about 3" tall.
As for the SAA application, it turns out that I've missed the application deadline. Oh, well. Probably would have just been rejected again anyway!
Friday, April 20, 2012
The End of Spring
Metaphorically. That is, the painting's finished. I made the lilac bluer and added detail. Joan said it needed leaves. I agreed with her and put them in. The leaves help integrate the lilac which was so isolated before.
I finished the frog and gave him a little shadow. The other design elements didn't bother me floating. Most touched the edge which helped anchor them. But the frog needed grounding.
My final touch was to add some gold, which I had been itching to do all along. I painted the script, "tempo di primavera" with a #0 script liner and Golden's liquid acrylic gold. It was the first time I used
that paint and really appreciated both the texture and the rich color. I also used it to solve my problem of the ragged edge between the image and the turquoise border. I touched all around it with the tip of a small bristle fan brush dipped in gold. It echoed the deckled effect already there but gave it a finished look.This piece flowed pretty easily. Deceivingly so. I tried to compose a similar piece on a winter theme, but no luck so far. I'll keep trying, but it will be a back burner project.
Wednesday, April 18, 2012
A Bit Further
I just had about an hour to work on this today and mostly what I did was darken the greens in the leaves and the browns in the butterfly. I finally opened my bottle of Van Dyke brown and I REALLY like it! Then I began to add detail in the lilac and part way through that I was once again reminded that this color is absolutely alone in this composition. So I added a bit of purple to the shadows on the bird and eggs and also just a hint around the roots of the seedling. I fooled with the frog for a while also.
So what's next? And how to finish it? I'd like to add some gold, but am not sure how I want to go about that. Also, the edges where the background meets the turquoise border aren't sharp. I masked them, but apparently didn't press the tape down hard enough because the paint bled under. Or, maybe I didn't use the right kind of tape. I'll have to look into that. I could clean up these edges by making the turquoise border opaque or I could just leave them and enjoy the "deckled" look, or I could try to enhance that "deckled" look somehow. Or there are probably even other possibilities.
I was contemplating how, in nearly every piece, I reach the point where I say to myself "it would have really helped if I had planned this out a bit." Yet I don't ever seem to resort to pre-planning. I guess I could say that I'm honing my problem-solving skills. Ha ha.
Subscribe to:
Posts (Atom)


