Friday, August 30, 2013

Paper Clay Hens

The paper clay portions are now done.  I've made the wings separate so I can dress my birds more easily.  The wings are on the left chicken temporarily, just for the photo.

Here's how I made the wings.  I cut the main shapes from cardboard and covered the right side with paper clay.  I made a wire spiral with one end of the wire protruding about 1" perpendicular to the center of the spiral.  I secured the spiral in place on the back of the wing under a blob of paper clay with the end of the wire sticking out from the clay (- this wire end will fit into a hole in the body, securing the wings in place).  When that dried, I covered the rest of the back with paper clay.  I then cut out individual cardboard feathers for the lowest row, covered them with paper clay, and stuck them in place on the underside of the wing tips.  I drilled holes in the sides of the bodies to accommodate the wires sticking out the backs of the wings.

It was only after I had a complete layer of paper clay on the first bird that I realized the legs were not in the right places for balancing.  So I had to saw through the paper clay and skewers at the base of the legs to remove them.  When the rest of the clay work was done I could determine where they properly belonged.  At this point I no longer had skewer ends to stick into the bodies, so I had to settle for attaching the legs with paper clay.  But there was still plenty of that to add to form the bulges at the tops of the legs, so they should be sufficiently securely attached.

I didn't continue working on the third chicken that you saw in yesterday's post - the one that was bending its head down.  When I began making these birds I was going to put them in a local show and sale in October.  But not far into the project I realized that there would be so much work in them that they would be over-priced for the event.  So I turned to an idea I've had for a month or so - Punk meets Goth.  The hen on the left will become my Goth hen, and the one of the right will be my Punk hen.  Making the costumes will really be fun - and quite a challenge.

But first, the painting!

Thursday, August 29, 2013

Chicken Mummies

 
I'm starting a new project - chicken dolls from paper clay.  They will have fabric clothes.  I'm planning a group of three, and here's the first step.  I've cut the basic shapes from Styrofoam, wrapped them tightly with stretch gauze bandaging, and then sealed them with Mod Podge.  The yellowish color you see on the left one is the result of my frustration with having a hard time keeping track of where I had and where I hadn't applied the (white) Mod Podge to the (white) gauze wrap.  So I mixed a bit of yellow alcohol ink into the Modge Podge to give it enough color that I could track my progress.
 
There are no wings yet.  I'll make them and paint them separately then add them during the clothing process.  This is to solve the problem of how to make clothing sleeves around the wings - a problem that I've been contemplating for a while and which is impeding my progress on finished the two ducks I made for the Lady of the Lake grouping.
 
The legs are made from wire, wooden scewers, and florist tape.  I shaped the toes from the wire then wound the ends up around the scewer.  A wrap of floral tape holds everything in place and provides a surface for the paper clay to stick to.  When the legs were done, I poked them into the Styrofoam form.
 
I later learned that attaching the legs at this point was a mistake.  It's too early to know where they need to be for the chickens to balance.  The better plan is to wait until the paper clay bodies are done, then drill holes, and insert the skewers.  This procedure also makes it easier to cover the toes with paper clay.  I can cover the toes and part way up the leg before attaching the legs to the body, then finish the attachment - and the sculpting - by adding the paper clay for the bulges at the top of the legs.  Lesson learned!

Wednesday, August 28, 2013

The Finished Scratchboard Fox

 
Here's the final scratchboard fox.  I did a second layer of color, this time with thin washes of Liquitex soft body acrylics, then another layer of scratching, and finally a few more washes.
 
I'm reasonably happy with the result, but unless I can come to terms with the difficulty of the first layer of color I'm not sure I'll stick with it.  I will, however, try at least one more time using the soft body acrylics rather than acrylic inks for the first color layer.  Hopefully that will work better.
 
I do like the luminous color one gets with the bright white clayboard shining through the paint.

Tuesday, August 27, 2013

Trying Color Scratchboard

Can you believe how ugly this is?  Well, thankfully, it was just the beginning.  Last weekend I took a brief scratchboard workshop from Linda Heath Clark, one of our art group's members.  Linda is quite an accomplished scratchboard artist and an excellent teacher.  She has even taught a workshop at the Smithsonian.  You would never guess that from this student's work!


I was expecting that we would work on the regular black scratchboard, but instead she taught us this color technique.
 
 We worked on clayboard.  The first step was to cover the board with acrylic inks and this is where it was really tough and frustrating.  I consider myself to be a decent painter, but I just couldn't get this ink on this surface to do what I wanted.  The ink wanted to puddle and I found it impossible to get a smooth stroke. But Linda convinced me that it would work out OK, so I persevered and proceeded to the scratching step.
 
This is what my fox looked like after about two and a half hours of scratching little lines through the dried ink into the layer of white clay on the clayboard.  Better, but still not done,  And as you can see, since I didn't scratch any lines in the background area, that part still looks like a mess.
 
From here, the technique is to wash over the painting with thin washes of color.  This will both deepen the color of the unscratched portions and push back the white scratches by giving them a bit of color.  So I will continue to work on this piece and then we'll see what's what!

Friday, August 9, 2013

A Literary Parrot


I was showing my daughter how to make the canvas covered journals and made this one.  I used her paints which are the tube acrylics rather than the soft body ones I usually paint with.   I followed my usual procedure, rag-rolling a couple of layers for the background then painting in the details - a rough suggestion of tropical foliage.  I then turned to the varnish, brushing it on then smoothing it with back-and-forth brush strokes.

I wasn't paying that much attention to what I was doing, but when I did look a bit more closely at my canvas I realized that my brush strokes with the varnish were actually lifting paint - yikes!

My daughter suggested that I was achieving a nice, if unintended, aged look, almost as though the years and the blowing sand from the nearby imagined beach had picked away at the painting.  With nothing I could do to repair the damage, I decided I liked the look.

But the lesson was clear - don't rush it!  Let the paint layers dry.  I tend to be a bit impatient, and this time the thicker paint was not so forgiving - and not so fast-drying - as the soft body.  Lesson learned?  I hope so!

Thursday, August 8, 2013

The Frog Armature

 
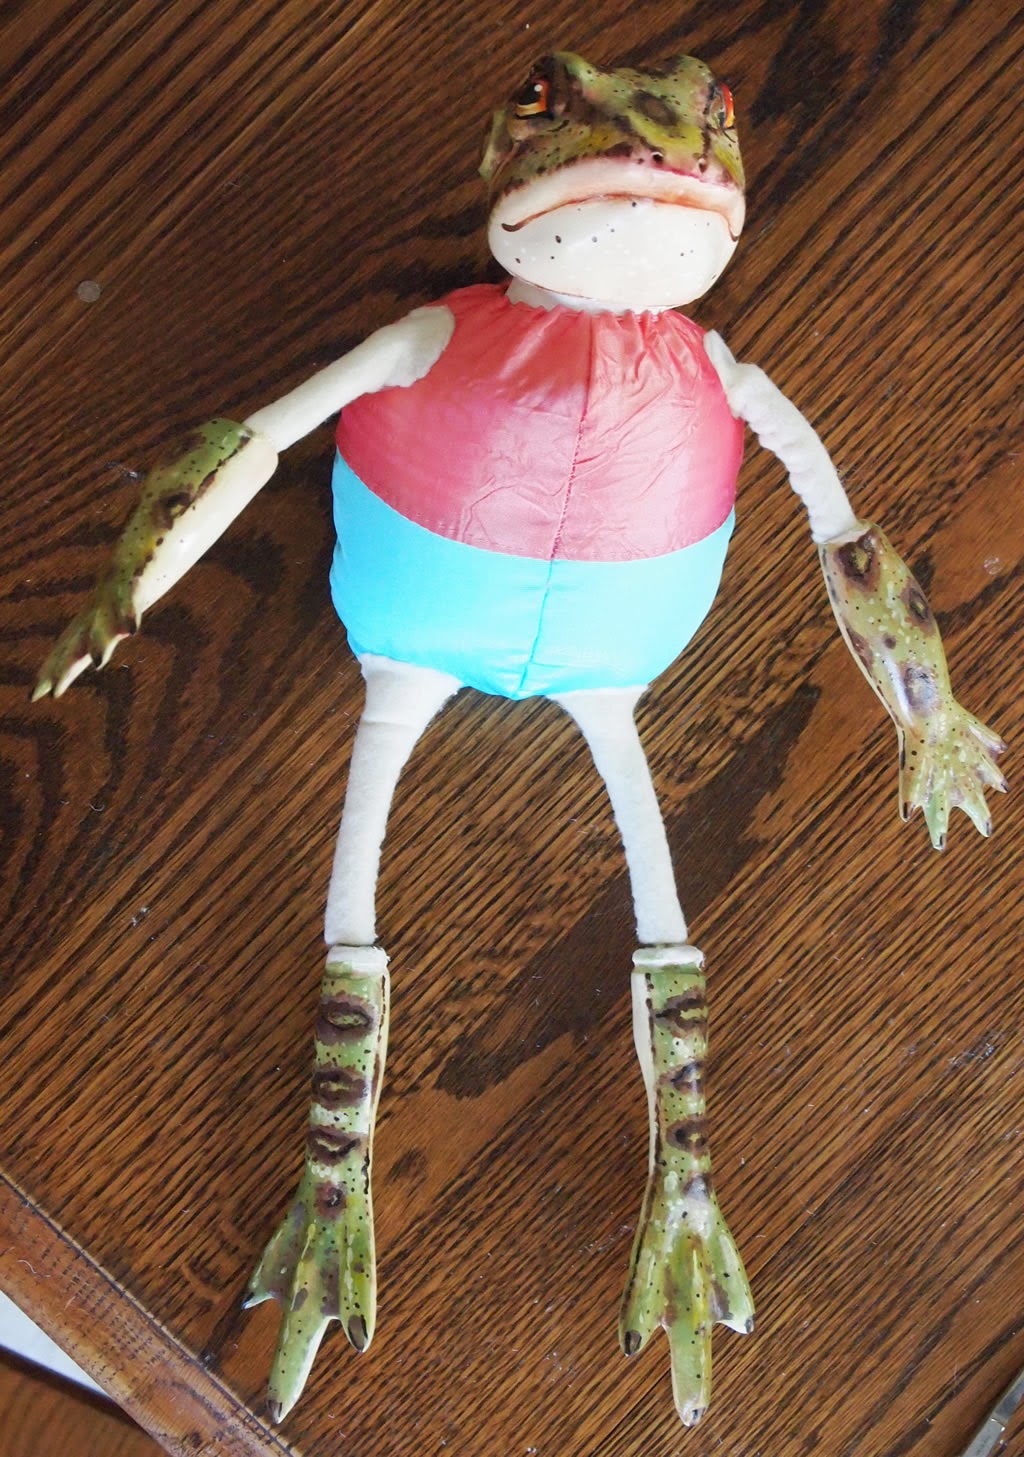
I've completed the armature and my frog is now ready to be dressed in her fairy outfit.  Here's how I made the armature.
 
The body is stuffed fabric.  I used the fabrics I intend to use for the outfit - the coral pink for the top and the turquoise for the bottom.
 
Three 12 gauge single strand plastic coated electrical wires form the "skeleton" of the armature.  One wire is the neck, spine, and left leg.  The second wire is the spine and right leg.  I wrapped these two together along the spine portions with 22 gauge craft wire then secured the wrapping with hot glue.  The third wire goes crosswise through the body for the arms and shoulders.
 
When I sewed the body pieces together I left an opening in the back for stuffing,  I cut tiny holes for threading the wires for the arms and legs.
 
I began the assembly by running a gathering stitch around the hemmed neck edge of the body and tying it tightly to attach the body to the neck.  (When I sculpted the head, I made a deep groove in the neck to accept the cloth body.)  Then  I inserted the spine/legs wires through the opening in the back of the body and threaded them through the small leg holes I had cut in the body.  I pulled the leg wires downward as far as I could to allow me some wiggle room for inserted the neck wire into the hole I had made in the bottom of the head, and I used hot glue to secure the head to the neck wire.  Finally, I inserted the arm wire into the body through one of the holes I cut for the arm wire, pushed it through the body, and out the opposite arm wire hole.
 
Then it was on to the stuffing.  I stuffed it pretty full so it would nice and sturdy, then stitched up the opening in the back of the body.
 
When I initially cut the wires for the arms and legs I made them longer than I thought I would need them, so now it was time to figure out how long I really wanted them and trim them to length.  I attached the lower arms/hands and lower legs/feet to the wires with hot glue. 
 
My final step was to stitch wrappings of felt strips around the upper arms and upper legs.  Since these areas are going to be covered with sleeves and pant legs I suppose the felt isn't strictly necessary.  But it adds a nice bit a bulk and, now that I think of it, prevents the arm wire from shifting back and forth. 

Wednesday, August 7, 2013

Painted Frog Bits


Now I'm nearly done painting the frog.  The head is finished, as is the arm at the top of the picture.  The legs and other arm I left partially finished to show the process I used to paint the frog's markings. 

The first step is shown in the leg that is lowest in the photo.  I've painted the top side green and the under side cream.  The only thing I've been somewhat careful about is the transition between the two colors, making sure it's right down the side.  The green paint is pretty splotchy but it doesn't matter.  In fact, it's good because in the end it will give the markings more variation.

The arm, next higher in the photo, shows the second step.  I've used a medium brown to paint in the major markings.  I used an old, small round bristle brush and a tapping stroke to get very uneven edges to my strokes.  Notice that on the larger makings I've left the centers green, and that on the leg the rings are elongated all across the front of the leg, almost looking like stripes.  I've used photos of leopard frogs for reference.

The next step, shown on the leg that's second from the top, is to add washes - burnt sienna over both the upper and lower sides, and a tiny bit of yellow here and there over the green side for a bit more color variation.  The burnt sienna wash on the lower, cream-colored side is very light, just giving a hint of a bit more warmth.  It's a bit heavier, and more uneven, on the green side.  Here the burnt sienna serves to tone down the green, since burnt sienna is a reddish brown and therefore a near compliment to the green.

The final step, shown in the top arm, is to add more color and texture.  I darkened the rings with burnt umber then again with a bit of dark burnt umber here and there.  Each time I added a darker color, I confined it to the center area of the lighter color Iwas painting over.  I added a few splotches of a very light yellow green on the green side of the ankles/wrists and hands/feet.  I also added uneven stripes of small splotches along the center of each digit to heighten the modeling effect.  Then I used the tip of my liner brush to add small dots.  On the green side, I used burnt umber and a metallic yellow green and metallic rust.  On the cream side, I just used burnt umber.

Throughout the painting I was intentionally pretty sloppy as I'm striving for an organic look.  Painting in layers this way, the whole thing looks pretty bad until the very end when things fall into place.